
Introduction
What are push notifications and how to use it ? Well push notifications are messages or alerts which are sent (pushed) to user's device, no matter if users application is opened or not.
When we talk about web push notifications, application will receive message pushed to it no matter if it is open or not, so user can fetch all "unread" messages when it comes online or open the app. Firebase Cloud messaging, or FCM how it will be called further in post, is a cross-platform messaging solution from Google which allow us to reliably send messages to our clients.
As we can see in official FCM documentation :
Firebase Cloud Messaging (FCM) is a cross-platform messaging solution that lets you reliably send messages at no cost. Using FCM, you can notify a client app that new email or other data is available to sync. You can send notification messages to drive user re-engagement and retention. For use cases such as instant messaging, a message can transfer a payload of up to 4000 bytes to a client app.
Prerequisite
The main idea of this post is to show you how you can implement Firebase with React, for this you need to have Google developer account. We will use create-react-app in order to create our test app, and we will use react-toastify for showing toaster message of our push notifications.
Creating our app
First thing we need to create our project, so run following commands to get started.
npx create-react-app firebase-test-app npm install firebase react-toastify npm start
First we used create-react-app to init our project which will be using for this demo, next thing is installing Firebase and react-toastify NPM modules and afterwards start the project.
Firebase setup
First thing you need to do is to create account if you dont already have it, so go to the firebase and register, if you already have an account just skip this step and go to the Firebase console. After we register we need to create new project and when we have a project created we need to register application afterwards which we will get Firebase configuration. In further sections we will see this step by step.
Creating project
This step is pretty easy, you need to go to Create new project, and you will get input for name of the project, so go ahead and enter name for the project. If you have no projects you will see Create new project button but if you already have project, you will have tiles with existing projects and go to + Add project. After you enter name you will be prompted to check or uncheck whether you want to use Google analytic. You can feel free to uncheck because we don't need it know but if you leave it checked it will make no harm. After all data are filled, you will see loader and afterwards will be redirected to the project screen.
Application registration
When your project is created you will need to choose platform you want to connect to your application, so we are using web project, so we can select web option. You will be prompted again to enter name for application you are about to register, after entering name you can proceed and configuration for your application will be generated, which will be needed to get token, connect and use the FCM. This given configuration you can copy, and we will provide it to our React application. When this last step is finished we have our FCM project setup, and we can start building our application. For the whole setup flow you can reference to image below, where I will show you how it looks.
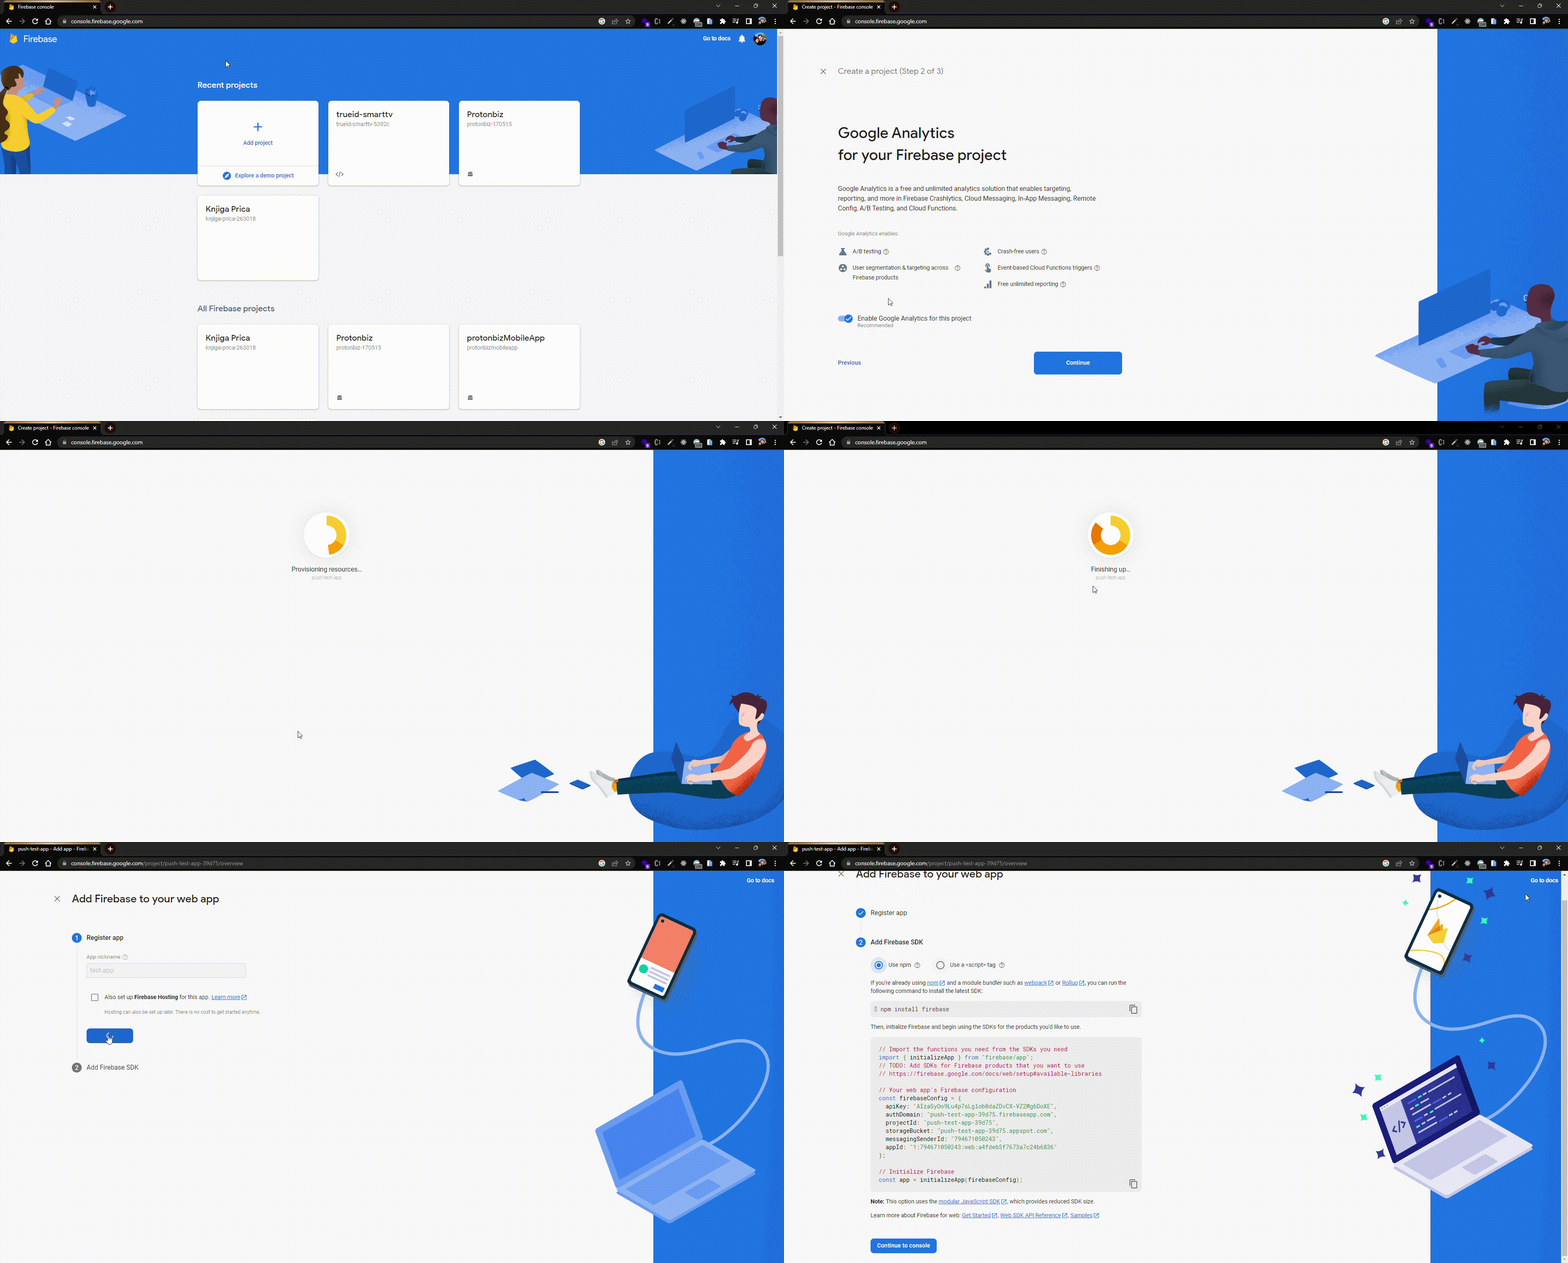
Firebase new project and app creation
React application setup
We have our Firebase project generated as well as configuration, so now we want to connect FCM to our application.
- ) Create
firebaseNotification.jsinside ofsrcand add following code:
import { initializeApp } from 'firebase/app'; // Insert firebase config that you got from Firebase console after creating app var firebaseConfig = { apiKey: "xxxxxxxxQIi6qkwdBTHnqSF0758hIlfUycHiGk", authDomain: "xxx-xxxxxx-5392c.firebaseapp.com", projectId: 'xxxxx, ... }; initializeApp(firebaseConfig);
2.) Import Firebase messaging module from firebase npm module into firebaseNotification.js:
import { getMessaging } from "firebase/messaging"; ... const messaging = getMessaging();
3.) One of the important things is to fetch token, so we need to create function like requestToken which will use Firebase's getToken method.
It will subscribe our application to push notifications (FCM) and it will require permission if it's not granted so be sure to Allow notifications in the browser in order to be able to receive token. If our application have necessary permission we will get token which we will later use to send push notification.
import { getMessaging, getToken} from 'firebase/messaging'; ... export const requestToken = () => { return getToken(messaging, { vapidKey: "<YOUR_VAPID_KEY>" }) .then((currentToken) => { if (currentToken) { console.log('current token for client: ', currentToken); // Do something with the token } else { // Token failed to fetch console.log('No registration token available. Request permission to generate one.'); } }) .catch((err) => { console.log('An error occurred while retrieving token. ', err); }); };
4.) Next thing we are required to do before sending push notifications, we need to generate VAPID or Voluntary Application Server Identification in order to use getToken method. In order to do this, go to Project Settings on your Firebase console, navigate to the Cloud Messaging tab and go to Web configuration section. You will find Web Push certification tab here you can click on Generate key pair.
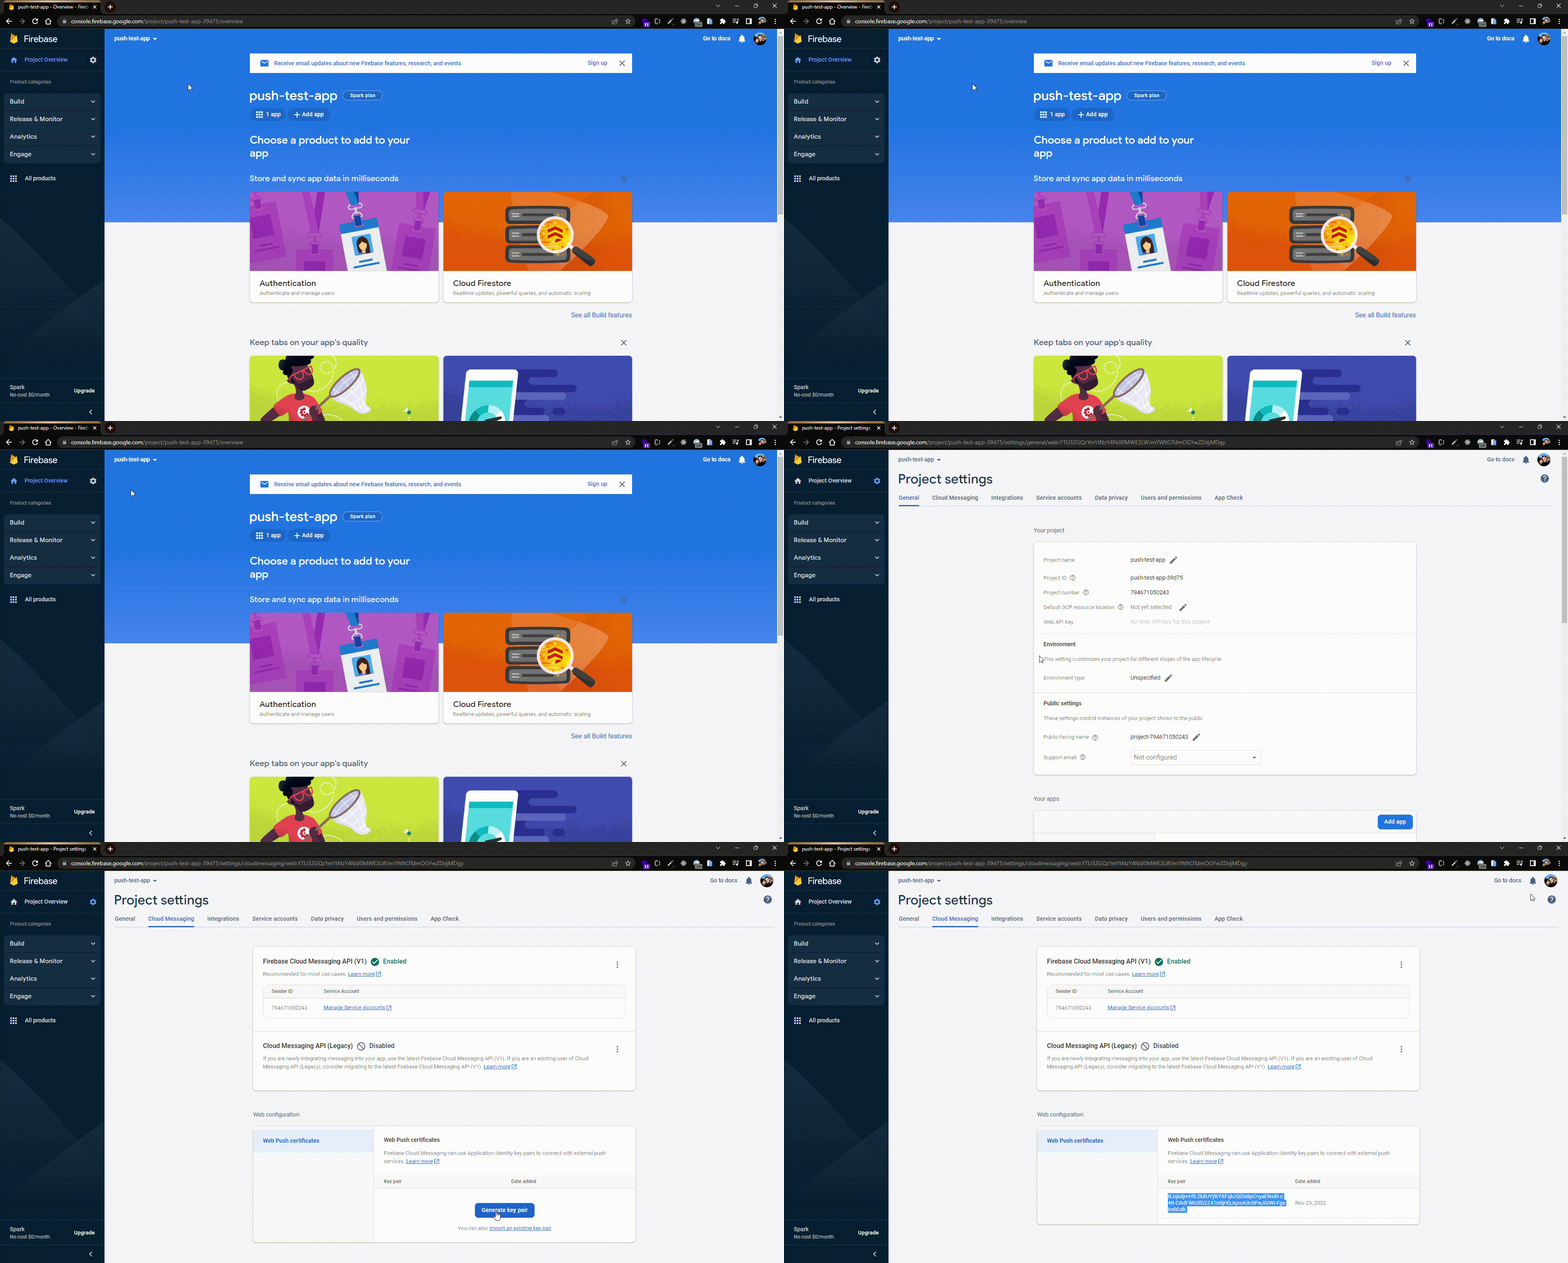
Generate VAPID key pair
Create Notification component
Now when we have VAPID key, we can import our firebaseNotification.js to our application, so next thing we will do is that we will create Notification.jsx react component. Here we will use react-toastify which I prefer, but you can use react-hot-toast or some other as you wish, to get toast message on FCM notification and we will import our requestToken and onMessageListener in order to fetch token and afterwards listen to new messages as they arrive.
Pay attention to import request token method and call it in order to FCM to work as you can see in code below.
We will create notify method inside useEffect in order to notify and push notification to client when message arrives. You can use following code:
import React, {useState, useEffect } from "react"; import { requestForToken, onMessageListener } from "./push-notification"; import { ToastContainer, toast } from 'react-toastify'; import 'react-toastify/dist/ReactToastify.css'; const Notification = () => { const [notification, setNotification] = useState({title: '', body: ''}); requestForToken(); const notify = () => toast(<ToastDisplay/>); function ToastDisplay() { return ( <div> <h2 style={{fontSize:'1em'}}><b>{notification?.title}</b></h2> <p style={{fontSize:'0.7em'}}>{notification?.body}</p> </div> ); }; useEffect(() => { if (notification?.title ){ notify(notification) } }, [notification]) onMessageListener() .then((payload) => { setNotification({title: payload?.notification?.title, body: payload?.notification?.body}); }) .catch((err) => console.log('failed: ', err)); return ( <ToastContainer theme="dark"/> ) } export default Notification
Receiving messages
So we can separate two ways of receiving messages foreground and background. First means that this listener will listen on the messages when the application is focused and opened and the other one means that service worker will listen to the notification messages when our application is closed.
Foreground listener
Foreground listener we already added, and it will be used when our application is open and focused.
This is code we already added to the firebaseNotification.js:
import { getMessaging, getToken, onMessage } from 'firebase/messaging'; const messaging = getMessaging(); export const onMessageListener = () => new Promise((resolve) => { onMessage(messaging, (payload) => { console.log("ON MESSAGE !!!!") console.log("payload", payload) resolve(payload); }); });
Background listener
Service worker or as we will call it background listener we will explain due to it being less known concept.
FCM requires one specific file which will be called firebase-messaging-sw.js inside public folder, so first go ahead and create this file.
Let's explain this part, in order to handle background messages, we will need to use service worker which is a script that browser can run in the background completely separated from the web page, and it can enable features that not requires web page or users interaction.
After creating you can add following code:
// Scripts for firebase and firebase messaging importScripts('https://www.gstatic.com/firebasejs/8.2.0/firebase-app.js'); importScripts('https://www.gstatic.com/firebasejs/8.2.0/firebase-messaging.js'); // Initialize the Firebase app in the service worker by passing the generated config const firebaseConfig = { apiKey: `<YOUR_FIREBASE_MESSAGING_API_KEY>`, authDomain: `<YOUR_FIREBASE_MESSAGING_AUTH_DOMAIN>`, projectId: `<YOUR_FIREBASE_MESSAGING_PROJECT_ID>`, storageBucket: `<YOUR_FIREBASE_MESSAGING_STORAGE_BUCKET>`, messagingSenderId: `<YOUR_FIREBASE_MESSAGING_SENDER_ID>`, appId: `<YOUR_FIREBASE_MESSAGING_APP_ID>`, measurementId: `<YOUR_FIREBASE_MESSAGING_MEASUREMENT_ID>`, }; // Initialization of the application firebase.initializeApp(firebaseConfig); // Retrieve firebase messaging const messaging = firebase.messaging(); // Background message listener messaging.onBackgroundMessage(function(payload) { console.log('Received background message ', payload); // Customize notification here const notificationTitle = payload.notification.title; const notificationOptions = { body: payload.notification.body, }; self.registration.showNotification(notificationTitle, notificationOptions); });
Sending push notifications
Let's test and checkout whether it is working as expected, in order to test it go to the Firebase console and send message
- In your project menu, go to Engage menu and there you will find submenu Cloud messaging
Click on button Create your first campaign
You will be prompted dialog to choose message type and platform, go on and select Firebase Notification messages and click on Create
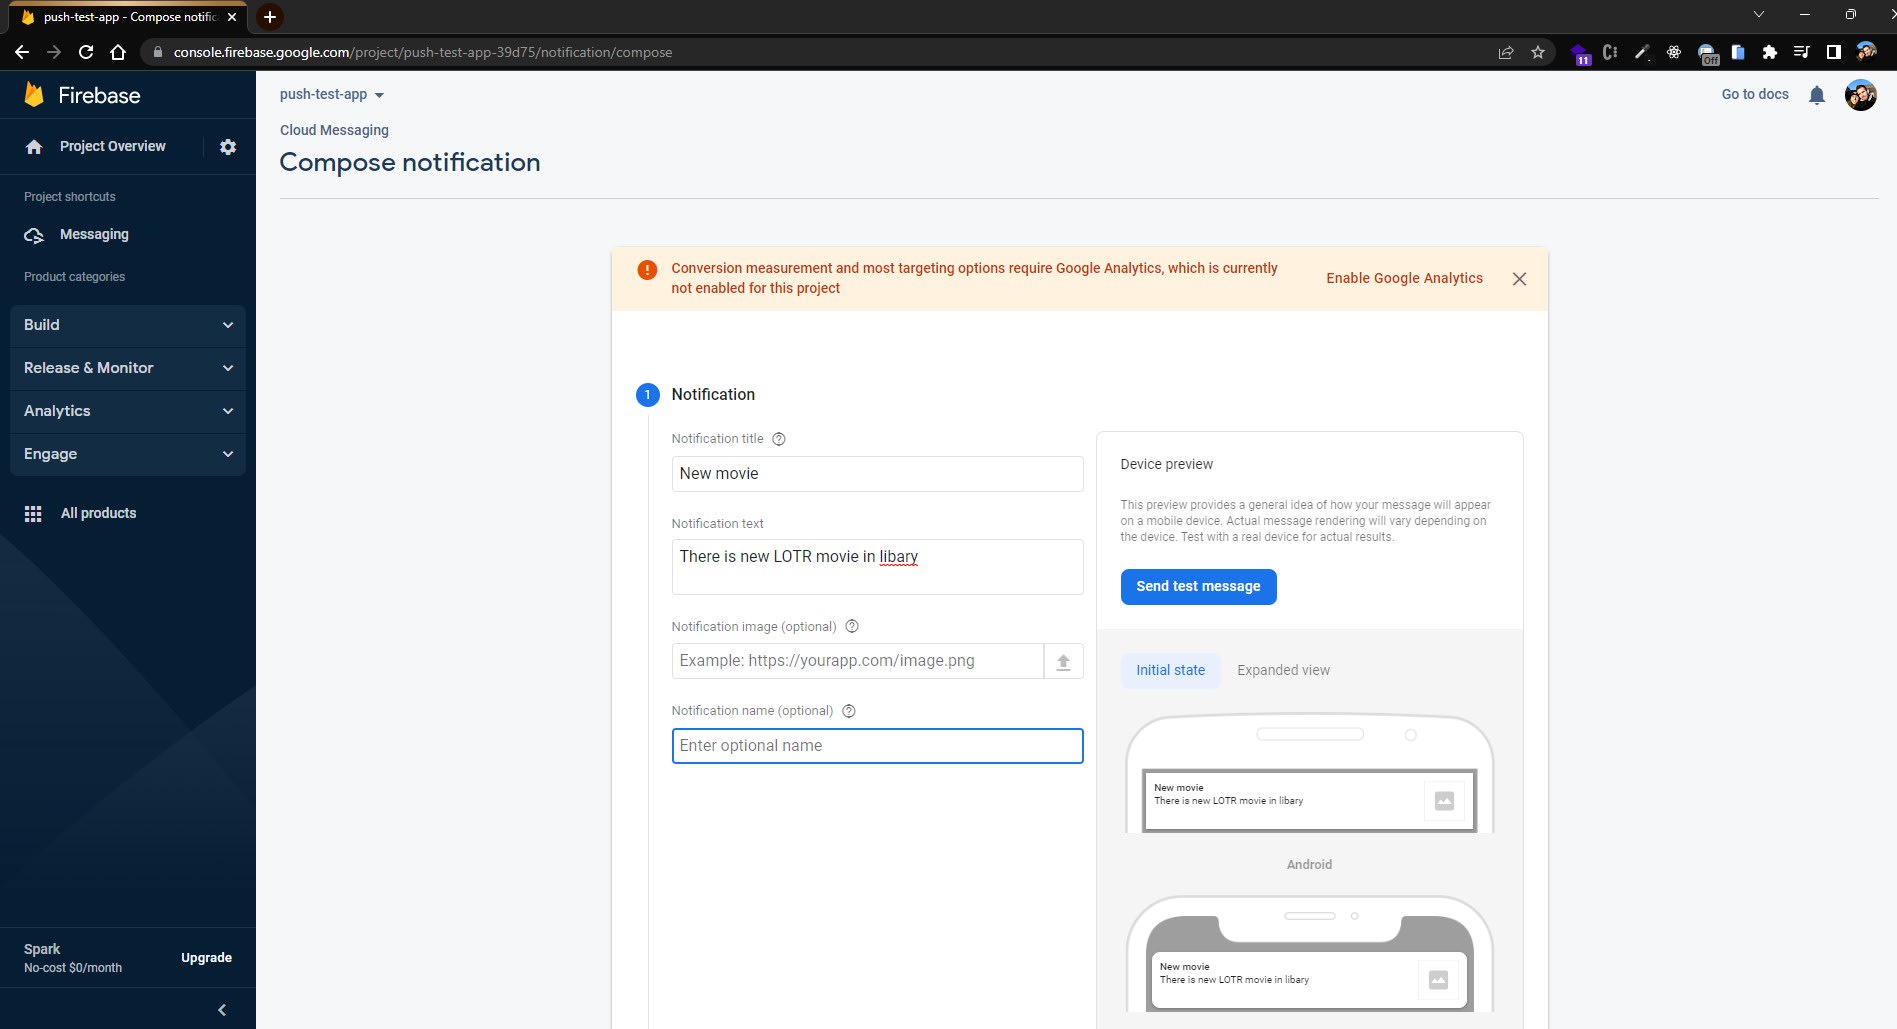
You will get input fields, enter Notification title and Notification text as these two fields are necessarry other we will skip.
Compose notification
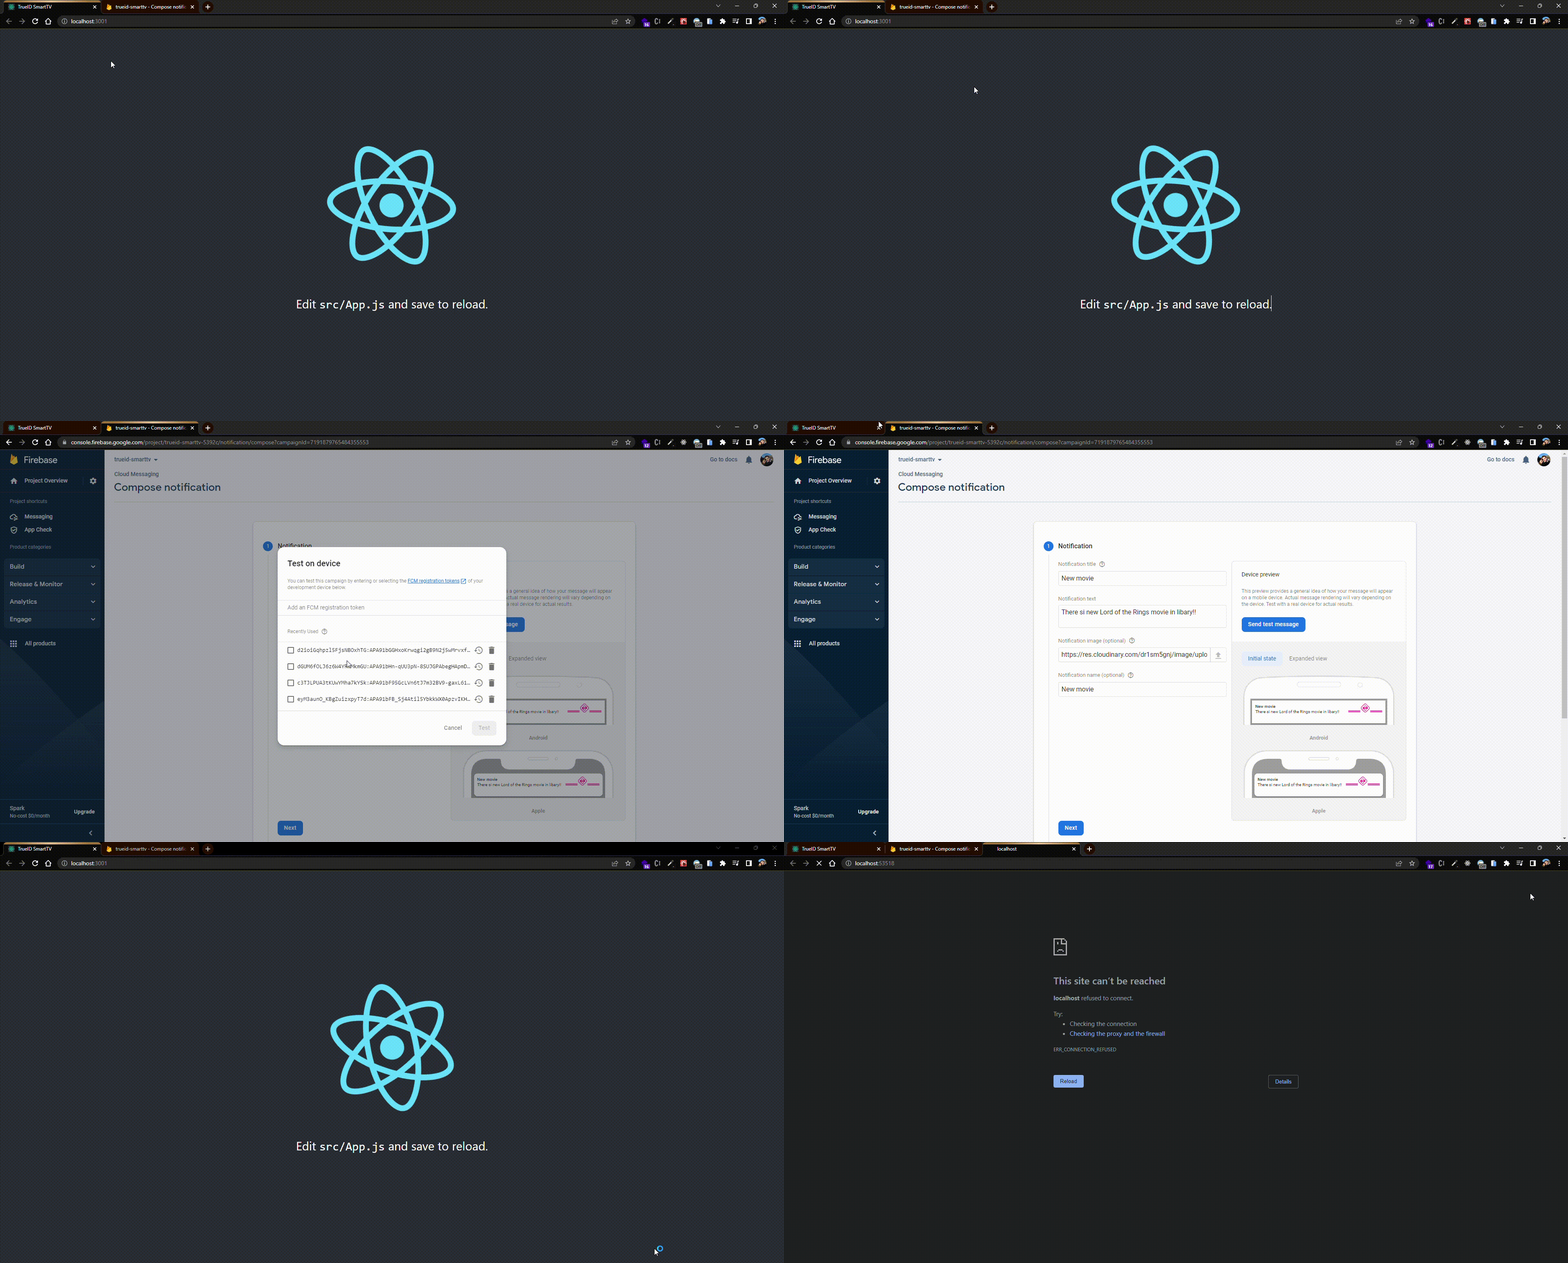
On the rigth side you have Send test message button and modal will popup. Here you can enter token you recieved and after that click on Test
And there. You have your notification toast inside your application. If you followed this guide you should get the same as on the image below. NOTE that we have recieved notification for our application and toast is visible. Unfortunately it is not visible on the video but I recived as well Windows notificaiton for the other application I selected when I was choosing tokens (you can see that I selected two tokens) and that application is closed and not running but its service worker is working and it detected notification so here you can see usage of service worker as well.
Recieving notification
Troubleshooting
At the first run, it is possible that you get permissions not being granted but blocked instead which mean that you need to Allow notification in your browser. If you get this error, be sure to check notification permission in browser.
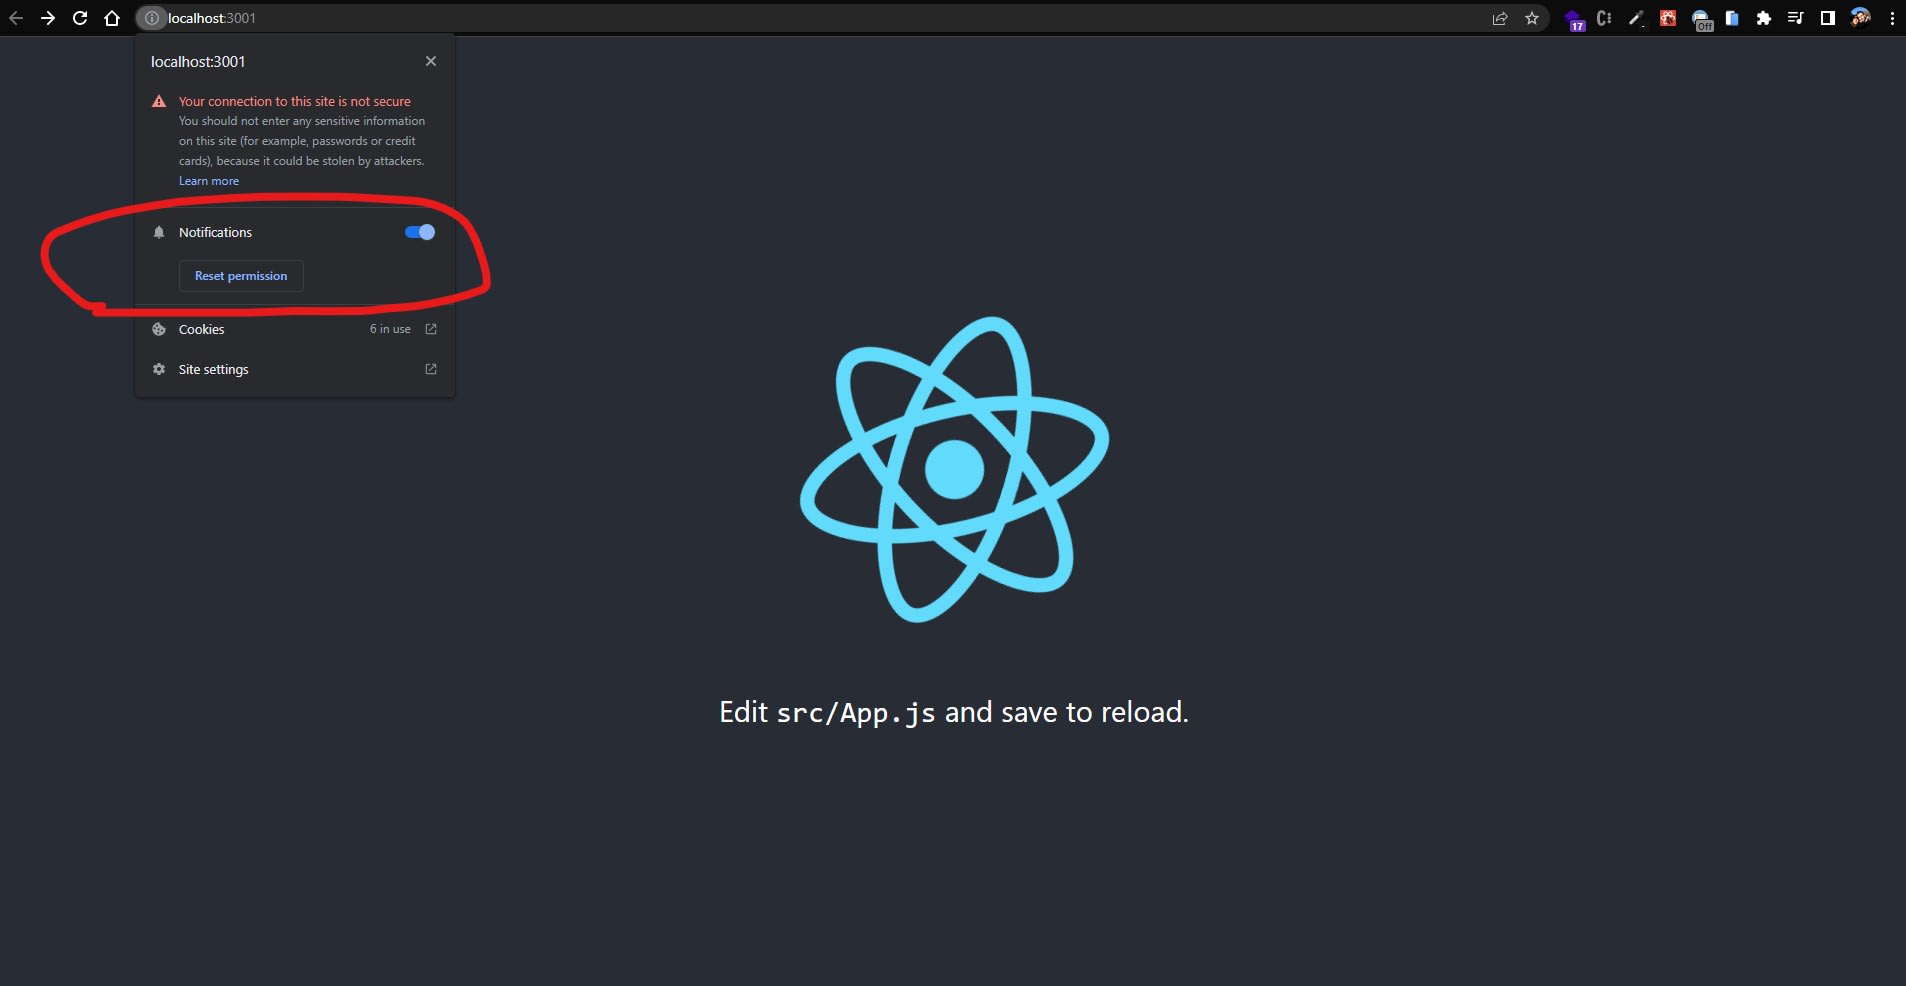
Notification permission in browser
Another error I encountered was missing required authentication credential which meant that I passed wrong VAPID_KEY. For more information about this and other possible errors on which you can encounter, please check this post